PLEASE VISIT MY NEW BLOG

Tuesday, April 8, 2014

Lockers: The Right Combination

pretty fonts
When the going gets tough, the tough get the paint out!  That's my mantra right now as I work towards giving my craft room a complete overhaul.


I'm happy with the way I transformed the Industrial Chic Cabinet, so I got started on this old school locker.

First things first, it got a much-needed cleaning.  Just simple dishwasher liquid and hot water did the trick.

I wanted to keep the handles in their original gray finish, so I taped them before painting the rest of the locker.

First, I sprayed a quick heirloom white metal primer onto the entire locker [inside and out].  To achieve some level of cohesiveness in my craft room, I decided to paint the locker the same color as the Industrial Chic Cabinet, a seafoam-aqua hue.  I again mixed the paint with some Plaster of Paris to create chalk paint. I used a small foam roller to easily apply the chalk paint to the five compartment doors.   I used a small painting brush to get inside all the nooks and crannies of the air vents.

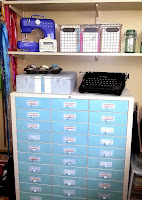
Here is the newly-painted locker:


 Of course, I can't just leave well enough alone, so I lined the shelves with coordinating scrapbook paper.
use scrapbook paper for lining shelves

I decided the front of the locker needed something extra as well, so I printed out numerals 1-5, and using my Xyron, turned them into stickers, and adhered them to the cabinet faces.
pretty fonts

old scales

Help me say good riddance goodbye to the plastic bins:

And hello to my transformed locker:

school lockers

I've been collecting vintage, rusty and old graters (and anything that resembles a grater), so now I have a place to display them.
grater vignette

Two graters hang on the side of the locker; one holds a memo pad.

Also displayed on top of the locker is a smaller version of my 
printed burlap and chicken wire

Here is a photo of two 2-drawer file cabinets.
rubber stamping on metal
 One is painted; and the other one is on the waiting list.
[Blame it on the locker.]

As you can see, my craft room is slowly being transformed 
from a bunch of plastic storage containers into 
Vintage Industrial Chic 

Craft Storage


 How do you store your craft supplies?

You may be interested in these projects:


Saturday, April 5, 2014

Spring Centerpieces


The next two weeks bring many people together. Not only are many families celebrating the joys of spring break (well, at least the kids are celebrating!), many are busy preparing for the week-long festival of Passover.  This is where we retell the story of the Exodus by reading the Haggadah, singing songs and eating specially-prepared foods.

When we were growing up, my parents invited friends and relatives to join us for our Seder. Because we had 25-30 people joining us, we moved our living room furniture into the dining room, and turned our living room into a large dining hall. With so many people, we created place cards to assign everyone a particular seat.  Making the place cards was always my responsibility...which I took very seriously.  

Last year, I re-instated my job and made place "cards" using small Terra cotta pots.  These are so much fun to create, and kids can get in on the creative action.  I decided to share this idea on my blog again this year, with a few minor revisions.

Materials:
Small clay pots in various sizes, no larger than 4"
Clay saucers

Blue & white acrylic paint
Mod Podge
Brushes
Clear sticker paper or Xyron sticker maker
Passover Graphics & Text
Twine
Wooden plant markers
Herbs (such as parsley)

This is the How-To:
I painted the pots in different combinations of blue and white paint.  While they dried, I printed graphics and text onto clear sticker paper.
Kosher for Passover logos


Next Year in Jerusalem


Then I adhered the stickers to the pots.  After coating each pot with Modge Podge, I wrapped blue and white baker's twine around two of the pots.

Passover centerpieces

Passover crafts
Pin It

I printed names on white cardstock, cut them out and mod podged the cards onto wooden plant markers, which I had painted blue.   


A green herb (such as parsley or cilantro) is used on the Passover table to symbolize spring. So I decided to plant herbs in each pot.
Pin It
I'm going to use the largest pot as a centerpiece, so I made a label that reads "Kosher for Passover." 

The smallest pot was just too tiny to hold a plant, so I used the medium sized pots for the place "cards."
Herb planters for holiday centerpieces

These festive pots and plant markers will add a nice touch to any Seder table.  The larger pot will also make a great hostess gift!  And, of course, depending on the colors and signage you use, these pots can easily be made for any holiday or occasion!

Whether you celebrate Passover, Easter or even just Spring Break, I hope you have a wonderful time with your family and friends.
Happy Spring!


Thanks for visiting!
Related Posts Plugin for WordPress, Blogger...